Prizm Content Connect
Using Redaction Reasons
| Working with the Viewer > Using the Viewer > Working with Redactions > Using Redaction Reasons |
Redaction reasons allow redacted content to be replaced with a redaction reason that can be configured by the application developer.
What happens to the redaction reasons text:
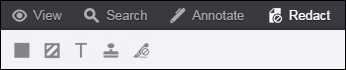
Redaction reasons are located under the Redaction menu:
 |
Redaction reasons are available with the Filled Rectangle and Text Selection redactions. The following instructions use the Text Selection redaction. |
Note that if you hover over the redaction, it is transparent.
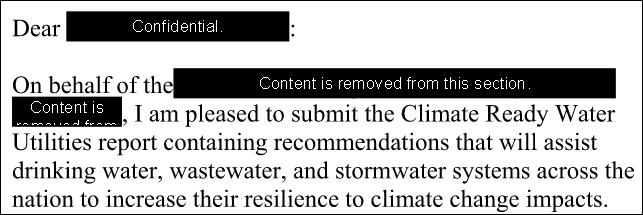
Note that the redaction reason text is displayed in the redacted area. If there are multiple lines of redacted text, the reason is displayed on each line of text.
Redaction reason data is automatically loaded from a file named "redactionReason.json" located at the root of each sample provided. If the redaction reason functionality is not needed, then removing this file will disable the ability to add reasons to redactions in the viewer.
The following example shows a reason set as the default in the redactionReason.json file:
Example ... {"reason": "Content is removed from this section.", "defaultReason": true} ...
When the viewer loads, the values from the redactionReason.json file will be read and viewer options will be appropriately set. If a"autoApplyDefaultReason" is set to true, then newly created rectangle or text selection redaction marks will automatically display the selected default reason text. If the "enableRedactionReasonSelection" is set to true then the reasons listed in the file will be made available as selectable options in the viewer interface when creating or updating rectangle or text selection redaction marks. If the "enableRedactionReasonSelection" is set to false, then users will not be able to modify the default reason after it has been applied.
Use the following example to set up redaction reasons:
| Example |
Copy Code
|
|---|---|
{
"autoApplyDefaultReason": true,
"enableRedactionReasonSelection": true,
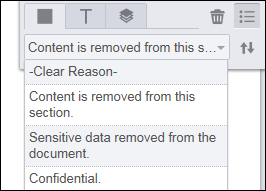
"reasons": [
{"reason": "Content is removed from this section.", "defaultReason": true}
,{"reason": "Sensitive data removed from the document."}
,{"reason": "Confidential."}
]
}
|
|
The following table shows the name, type and description available:
| Name | Type | Description |
| autoApplyDefaultReason | boolean | When set to true, default redaction reason will be automatically applied when mark is created. If this property is not provided it will be considered as false. |
| enableRedactionReasonSelection | boolean | When set to true, the redaction reasons will be loaded into the viewer and available for the end user to select the reason from the list. If this property is not provided it will be considered as true. |
The following table shows how the options in the JSON file affect what tabs are displayed in the redaction reason context menu:
| enableRedactionReasonSelection | autoApplyDefaultReason | Reason Dropdown Tab | Font Tab |
| true | true | displayed | displayed |
| true | false | displayed | displayed |
| false | true | hidden | displayed |
| false | false | hidden | hidden |